Perform A Chart Review
Source:vignettes/usage_perform_chart_review.Rmd
usage_perform_chart_review.RmdGetting Started
First make sure that you:
- Have ReviewR installed. (See Local Deployment or Shiny Server Deployment vignettes for more.)
- Have connected to your record database. (See Connect to Patient Record Database vignette for more.)
- Have connected to REDCap. (See Connect to REDCap vignette for more.)
Once these steps are complete, you are ready to perform chart review.
Patient Search
Begin by opening the ‘Patient Search’ section and identifying a patient to review. To locate a particular patient you may search by any of the available fields by entering a search term in the box at the top of each column, or search globally across all columns by utilizing the search box in the upper right. The right most columns indicate the review status of each individual in the connected dataset. As you review subjects and upload information to REDCap, or other project users complete reviews, these columns will update indicating the current review status of each subject. Once you have selected a patient of interest, click the subject ID, highlighted in blue in the leftmost column, to be taken to the ‘Chart Review’ page.
 of the CMS 2008-2010 Data Entrepreneurs’ Synthetic Public Use File (DE-SynPUF) from OHDSI.*](reviewr_pt_search.png)
Patient Tab displaying a 50 person subset of the CMS 2008-2010 Data Entrepreneurs’ Synthetic Public Use File (DE-SynPUF) from OHDSI.
Chart Review
Clicking a subject ID from the ‘Patient Search’ page will automatically redirect you to the ‘Chart Review’ portion of ReviewR. Here, you will be greeted by a screen similar to this:
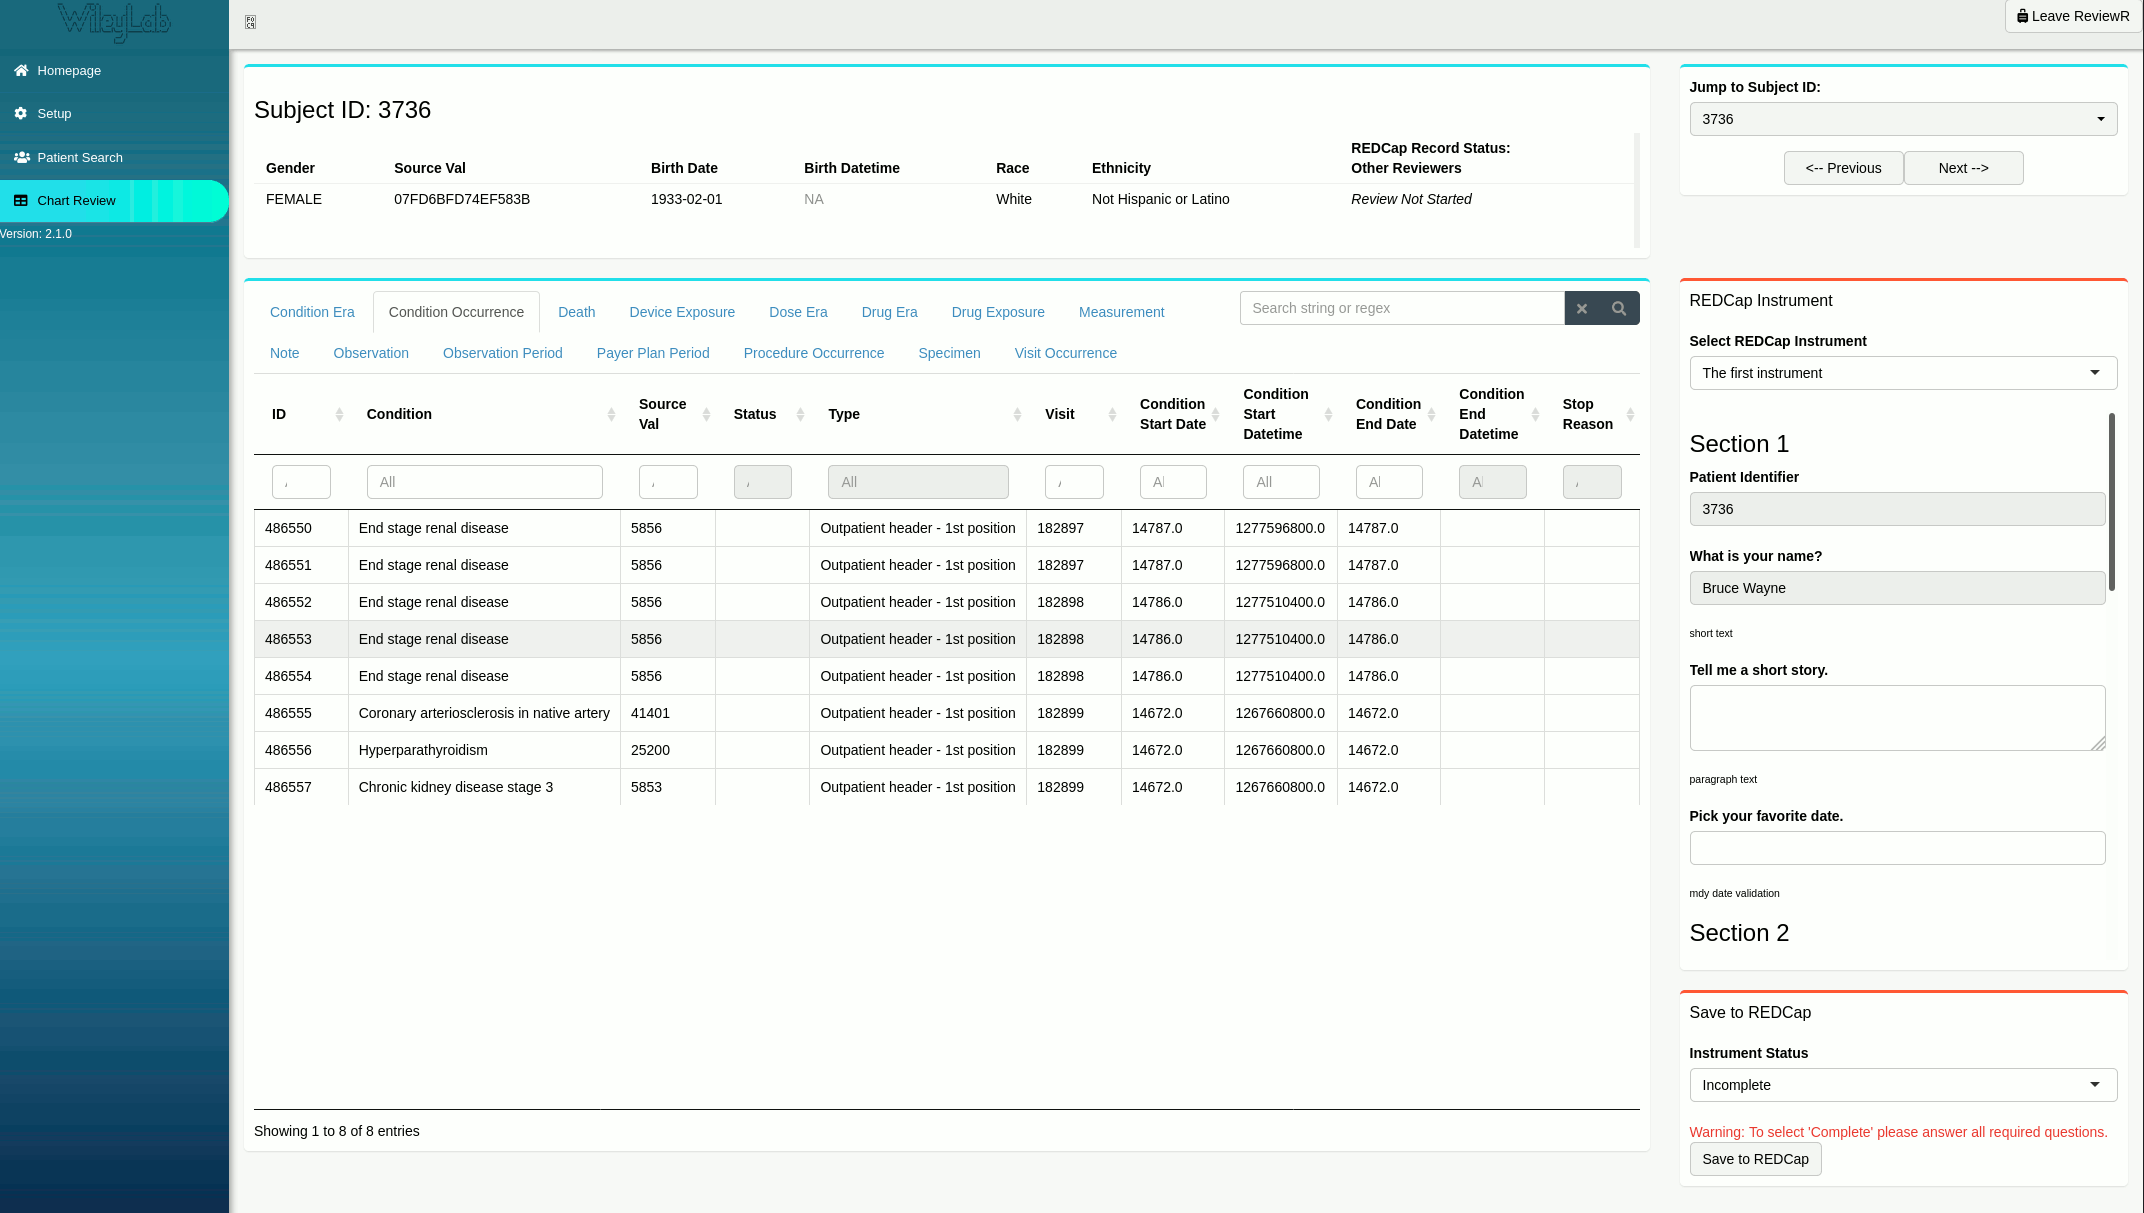
ReviewR Chart Review: Everything’s Shiny, Cap’n. Not to fret.
Note that the ‘Chart Review’ page is divided into roughly 4 quadrants, which will be discussed below.
Subject Header
The Subject header contains demographic information about your selected subject and takes up the upper left portion of the ‘Chart Review’ page. This information is extracted directly from the ‘Patient Chart’ page and will give you a quick reference to demographic information about your patient. When configured, review status will also be available in this pane.
Your saved review status for the particular subject in context will appear next to the subject ID with a visual indicator:
- “Review Not Started (blank)” - Status has not yet been assigned.
- “Incomplete (red)” - Not all questions have been answered, or a required question has been left unanswered.
- “Unverified (yellow)” - Questions have been answered, but require additional review.
- “Complete (green)” - All required questions for the selected instrument have been answered.
The status assigned by other reviewers will appear in the right most column of demographic information in the subject header.
Jump to Subject ID
This dropdown contains a listing of all of the subjects in your connected dataset, along with the review status you have assigned, if present. It allows you to review subjects in any order.
Patient Chart
The patient chart occupies the lower left portion of the screen. This tabbed panel contains all of the patient tables that have been defined for a particular data model. Access each table by clicking the tab at the top of this pane. Search within table fields by entering a search term or regular expression string in the search box located at the top of each table column. You may also enter a ‘global search’ term in the box located in the upper right portion of this pane. Global search applies the search string or regex to every field of every connected table, and highlights any results that are found.
REDCap Instrument
The REDCap Instrument section of the ‘Chart Review’ page is where information about the selected subject may be captured. At the very top of this pane will be the instrument selector. This drop down allows the user to select any configured instruments from a connected REDCap project.
Take a look at the instrument where you have added the fields to hold subject ID and reviewer ID. Note that these fields have been automatically populated with the currently selected subject and currently configured reviewer, respectively. These values may not be modified manually.
Additionally, all of the other configured fields from your REDCap project will be rendered, with native Shiny controls. Field notes will be rendered below the Shiny widget, along with an indicator for required question types. If you happen to include a field type that is not yet supported, a placeholder message will be rendered, indicating that this field type may not be used.
As with REDCap on the web, a form status may be set for each subject/instrument included in the REDCap Project. See the Subject Header section for an overview of supported statuses.
To save responses, click the ‘Save to REDCap’ button. A notification will appear indicating that data was saved successfully or a modal detailing any potential conflicts if attempting to overwrite existing REDCap data.
Keyboard Navigation
In order to speed up the manual record review process with ReviewR, keybindings have been added for common review tasks:
- “Meta + Ctrl + >” : Navigate to the next subject
- “Meta + Ctrl + <” : Navigate to the previous subject
- “Meta + Ctrl + s” : Save currently entered abstraction information
Note: Meta refers to the command key (⌘) on macOS and the Alt key on windows/unix based systems