Getting Started
In order to save information about individual records during your review, you will want to connect ReviewR to REDCap. Please note that this requires that you have access to REDCap through your institution and to set up an approved REDCap project that has access to an API key.
Create a REDCap Project
To begin, create a REDCap project on your institution’s REDCap instance. Add any users that you would like to be able to access this project, and ensure that their permissions include:
- Data Export Tool: Full Data Set
- API: Import
- API: Export
- Create Records
Once users have been added and permissions set, have users log into the project, and request API access to the project. Each user will require their own API key to access the abstraction functionality of ReviewR.
Design REDCap Instrument(s)
After your project has been initialized with users added and API keys have been provisioned, you’ll have to design an instrument for your REDCap project. Your institution should have resources to help teach you how to complete this step. There are a few considerations you should know for compatibility with ReviewR.
Required Field to Include
In order to link your review to the individual chart being reviewed you need to include a field to capture the record identifier (e.g., the stable identifier associated with each unique record/patient in your data set). This required field should be created with the “Text Box (Short Text, Number, Data/Time, …” data type in REDCap.
Suggested Field to Include
Optionally, you may also want to record who performs the review. This “Reviewer” identifier is not required to use ReviewR. However if you do wish to record who performed the review, please create this field with the “Text Box (Short Text, Number, Data/Time, …” data type in REDCap. When you configure REDCap in ReviewR you will have the ability to enter the reviewer’s name or select from previous reviewers who have submitted data to the project.
Supported Instrument Types
ReviewR supports projects with either a single or multiple instruments.
At this time ReviewR does not support longitudinal or repeating instruments, nor does it support instruments that use conditional logic.
Supported Field Types
When designing your instrument/s for use with ReviewR, please only include supported field types. Currently, ReviewR supports the following REDCap project field types:
| REDCap Field Type | Supported Validation Options |
|---|---|
| Checkboxes (Multiple Answers) | NA |
| Multiple Choice - Drop-down List (Single Answer) | NA |
| Multiple Choice - Radio Buttons (Single Answer) | NA |
| Notes Box (Paragraph Text) | NA |
| Text Box (Short Text, Number, Data/Time, ...) | None; Date (M-D-Y); Integer |
| True - False | NA |
| Yes - No | NA |
Connect and Configure REDCap in ReviewR
Once you have set up your REDCap project as defined above, you are
ready to connect to it from ReviewR. Load ReviewR either by visiting
your institution’s deployed URL, or by running
ReviewR::run_app() from your local R installation. Head to
the setup tab and connect to your patient data, using the “Connect to
Patient Database” pane (see Connect
to Patient Record Database) vignette for more).
Connect to REDCap Project
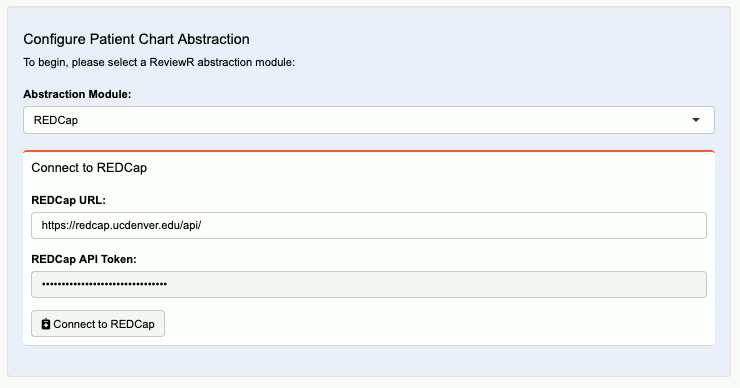
You are now ready to connect to REDCap. From the “Configure Patient Chart Abstraction” pane, select “REDCap” from the Abstraction Module drop down. Next, enter your institution’s REDCap API URL, and REDCap API key that was created for your REDCap project.

Add REDCap Connection information.
After entering this information, click the “Connect to REDCap” button. Note that the connect button will only appear after both a URL and API key are supplied. If the connection is successful, information about the connected project will be displayed including:
- REDCap Project ID
- Project creation date
- Production status
Configure REDCap
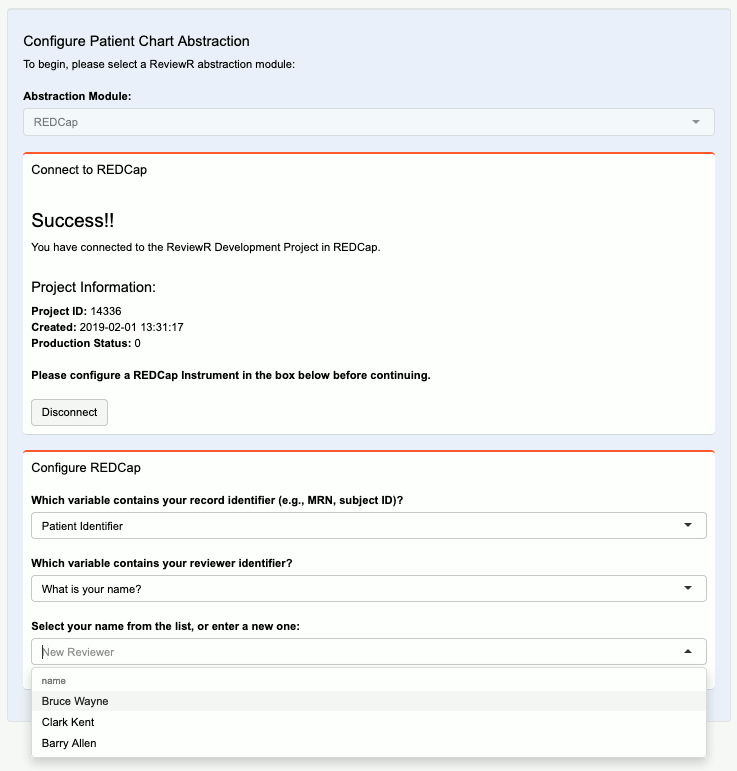
Once a successful connection is made to a REDCap project a ‘Configure REDCap’ dialogue will appear. Here is where we will select the REDCap Question that will hold patient identifier. Additionally, if configured in your REDCap project, select which field should contain your reviewer information.
One these fields are set, ReviewR will see if any information has been entered into the project. If previous information is found with a reviewer associated, it will populate a drop down with reviewers that may be selected.

Select from available reviewers.

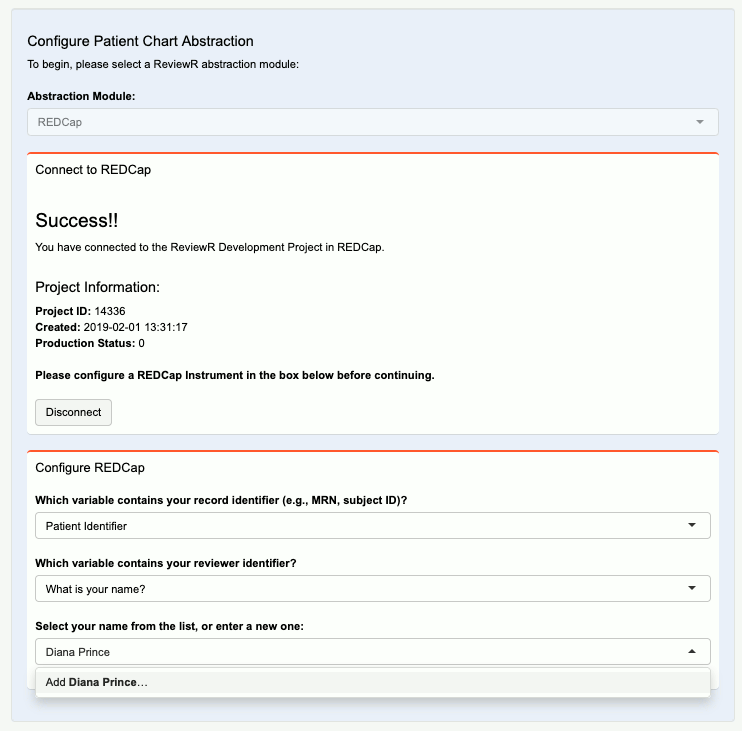
Add a new reviewer.

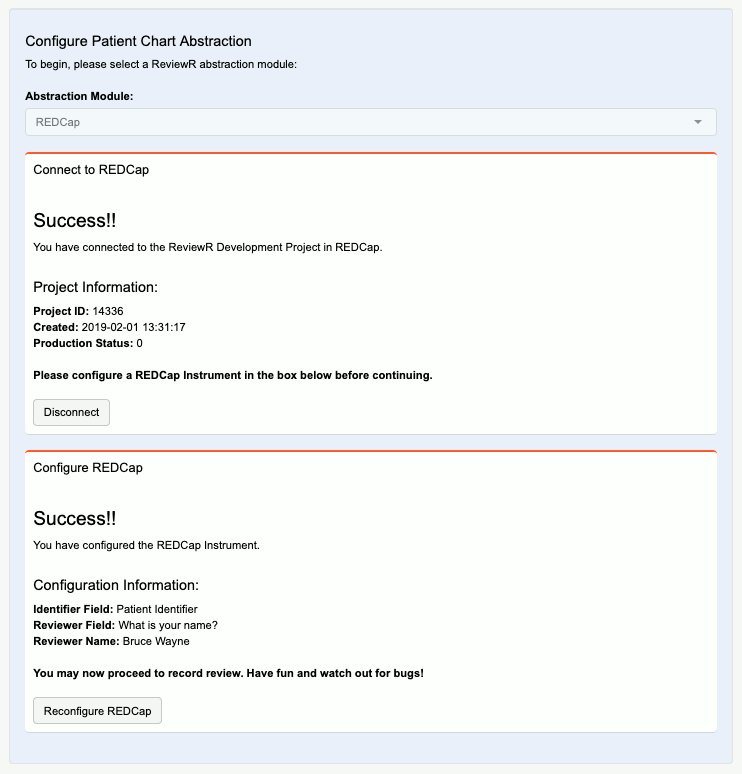
Review selections when configured
Disconnect/Reconfigure
At any point during the setup process, you may click “Disconnect” to connect to a different REDCap project, or “Reconfigure REDCap” to set new configuration options.
Next Step
ReviewR is now ready for you to view and record information from the connected database. For information on how to perform a chart review, please see the Perform A Chart Review vignette for more.